Identification of pathogens from sequencing data and tracking their presence across multiple samples.
Pathogen detection is a core activity in clinical microbiology and public health surveillance, aimed at identifying and characterizing disease-causing bacteria from isolates or clinical samples to support diagnosis, surveillance, and outbreak investigations.
Despite its importance, pathogen detection presents several challenges:
Genetic variability across species, strains, and lineages can complicate accurate identification.
Closely related non-pathogenic strains may be difficult to distinguish from true pathogens.
Result interpretation requires clinical and epidemiological context, as detection alone does not always imply pathogenicity.
After detecting a potential pathogen, results are interpreted by:
comparing genomic features against reference databases,
assessing virulence factors and antimicrobial resistance genes,
integrating genomic findings with clinical and epidemiological data.
This integrated approach helps distinguish true pathogens from background organisms and supports informed public health and clinical decision-making.
In this tutorial, we use datasets from a comprehensive study that analyzed the genomic composition of Vibrio cholerae isolates, focusing on virulence genes, pathogenicity islands, and antimicrobial resistance genes.
The dataset includes 10 whole-genome sequences of V. cholerae isolates.
Isolates were collected during three cholera outbreaks that occurred in Uganda between 2014 and 2016.
Sequencing data are publicly available in the NCBI Sequence Read Archive under accession SRP136117.
For the purposes of this tutorial and due to time constraints, the analysis starts directly from assembled contigs, skipping the initial quality control and genome assembly steps.
 https://github.com/vappiah/bioinfodata/raw/main/genome-assemblies/vibrio-cholerae/raw/batch1/SRR6871245.fasta
 https://github.com/vappiah/bioinfodata/raw/main/genome-assemblies/vibrio-cholerae/raw/batch1/SRR6871246.fasta
 https://github.com/vappiah/bioinfodata/raw/main/genome-assemblies/vibrio-cholerae/raw/batch1/SRR6871247.fasta
 https://github.com/vappiah/bioinfodata/raw/main/genome-assemblies/vibrio-cholerae/raw/batch1/SRR6871248.fasta
 https://github.com/vappiah/bioinfodata/raw/main/genome-assemblies/vibrio-cholerae/raw/batch1/SRR6871249.fasta
 https://github.com/vappiah/bioinfodata/raw/main/genome-assemblies/vibrio-cholerae/raw/batch1/SRR6871250.fasta
 https://github.com/vappiah/bioinfodata/raw/main/genome-assemblies/vibrio-cholerae/raw/batch1/SRR6871251.fasta
 https://github.com/vappiah/bioinfodata/raw/main/genome-assemblies/vibrio-cholerae/raw/batch1/SRR6871252.fasta
 https://github.com/vappiah/bioinfodata/raw/main/genome-assemblies/vibrio-cholerae/raw/batch1/SRR6871253.fasta
 https://github.com/vappiah/bioinfodata/raw/main/genome-assemblies/vibrio-cholerae/raw/batch1/SRR6871254.fasta
In order to search AMR genes among our samples’ contigs, we run ABRicate and choose the
NCBI Bacterial Antimicrobial Resistance Gene Database (AMRFinderPlus)
from the advanced options of the tool.
ABRicate checks if there is an AMR found or not,
if found then in which contig it is,
its location on the contig,
what the name of the exact product is,
what substance it provides resistance against and a lot of other information regarding the found AMR.
ABRicate Tool with the following parameters:
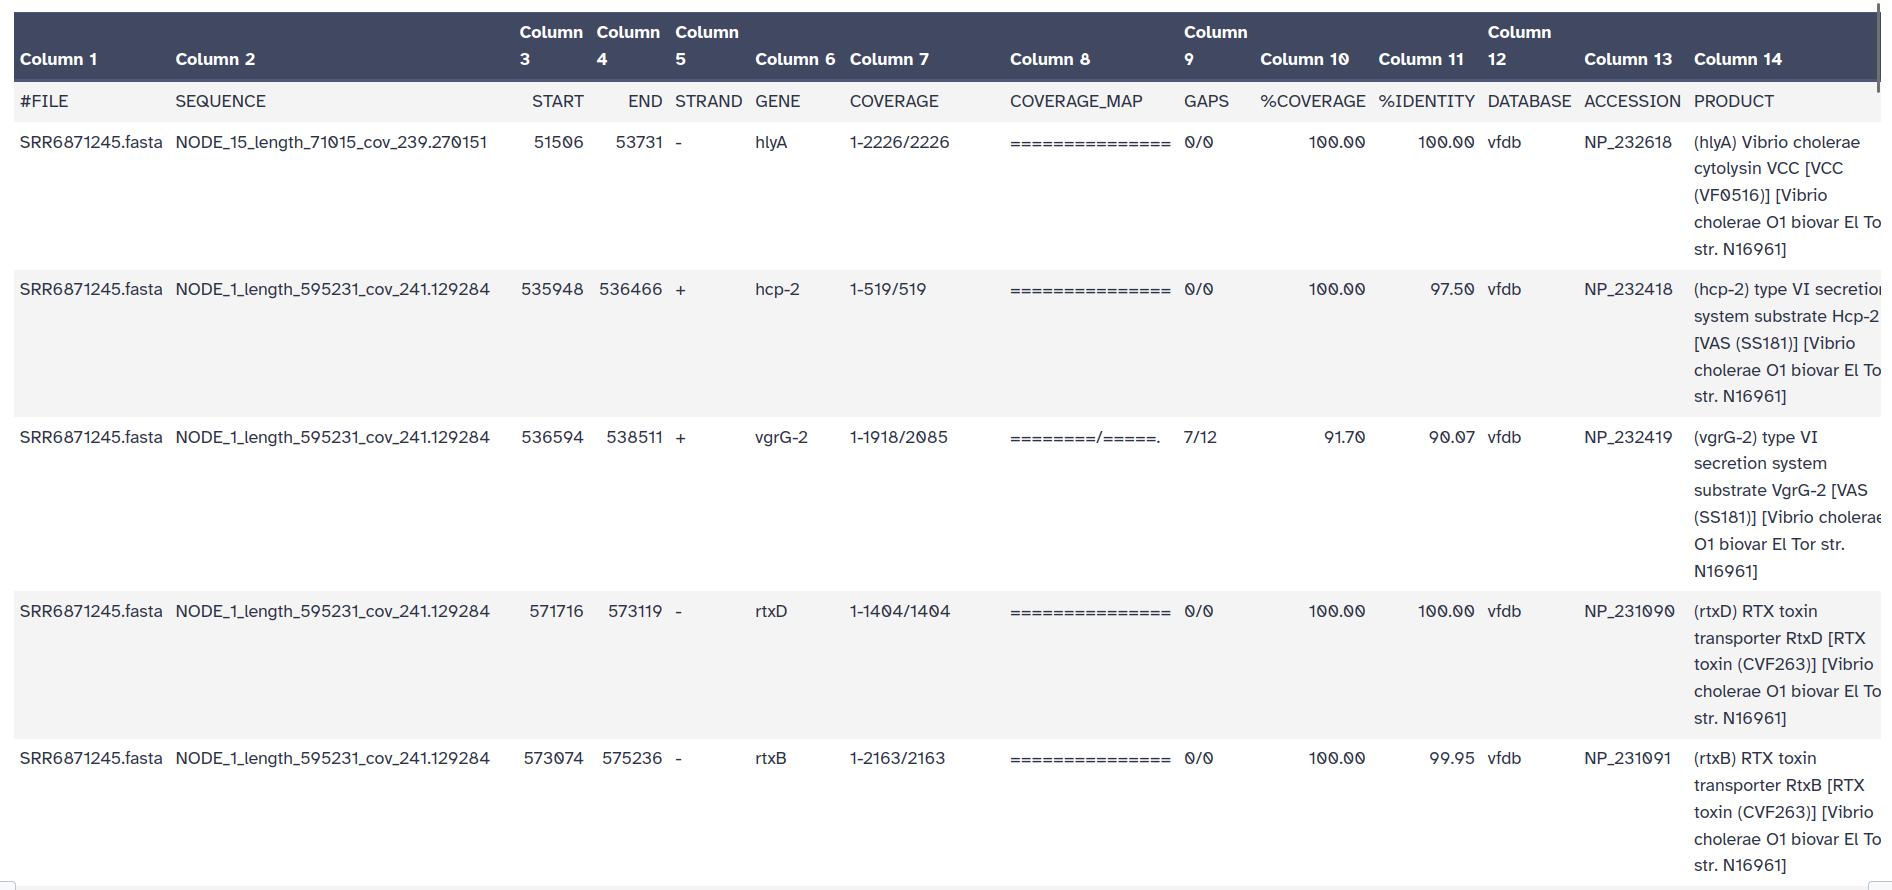
The outputs of ABRicate is a tabular file with different columns:
FILE: The filename this hit came from
SEQUENCE: The sequence in the filename
START: Start coordinate in the sequence
END: End coordinate
STRAND: Strand
GENE: AMR gene
COVERAGE: What proportion of the gene is in our sequence
COVERAGE_MA: A visual representation
GAPS: Was there any gaps in the alignment - possible pseudogene?
%COVERAGE: Proportion of gene covered
%IDENTITY: Proportion of exact nucleotide matches
DATABASE: The database this sequence comes from
ACCESSION: The genomic source of the sequence
PRODUCT: Gene product (if available)
RESISTANCE: Putative antibiotic resistance phenotype, ;-separated

TRY!
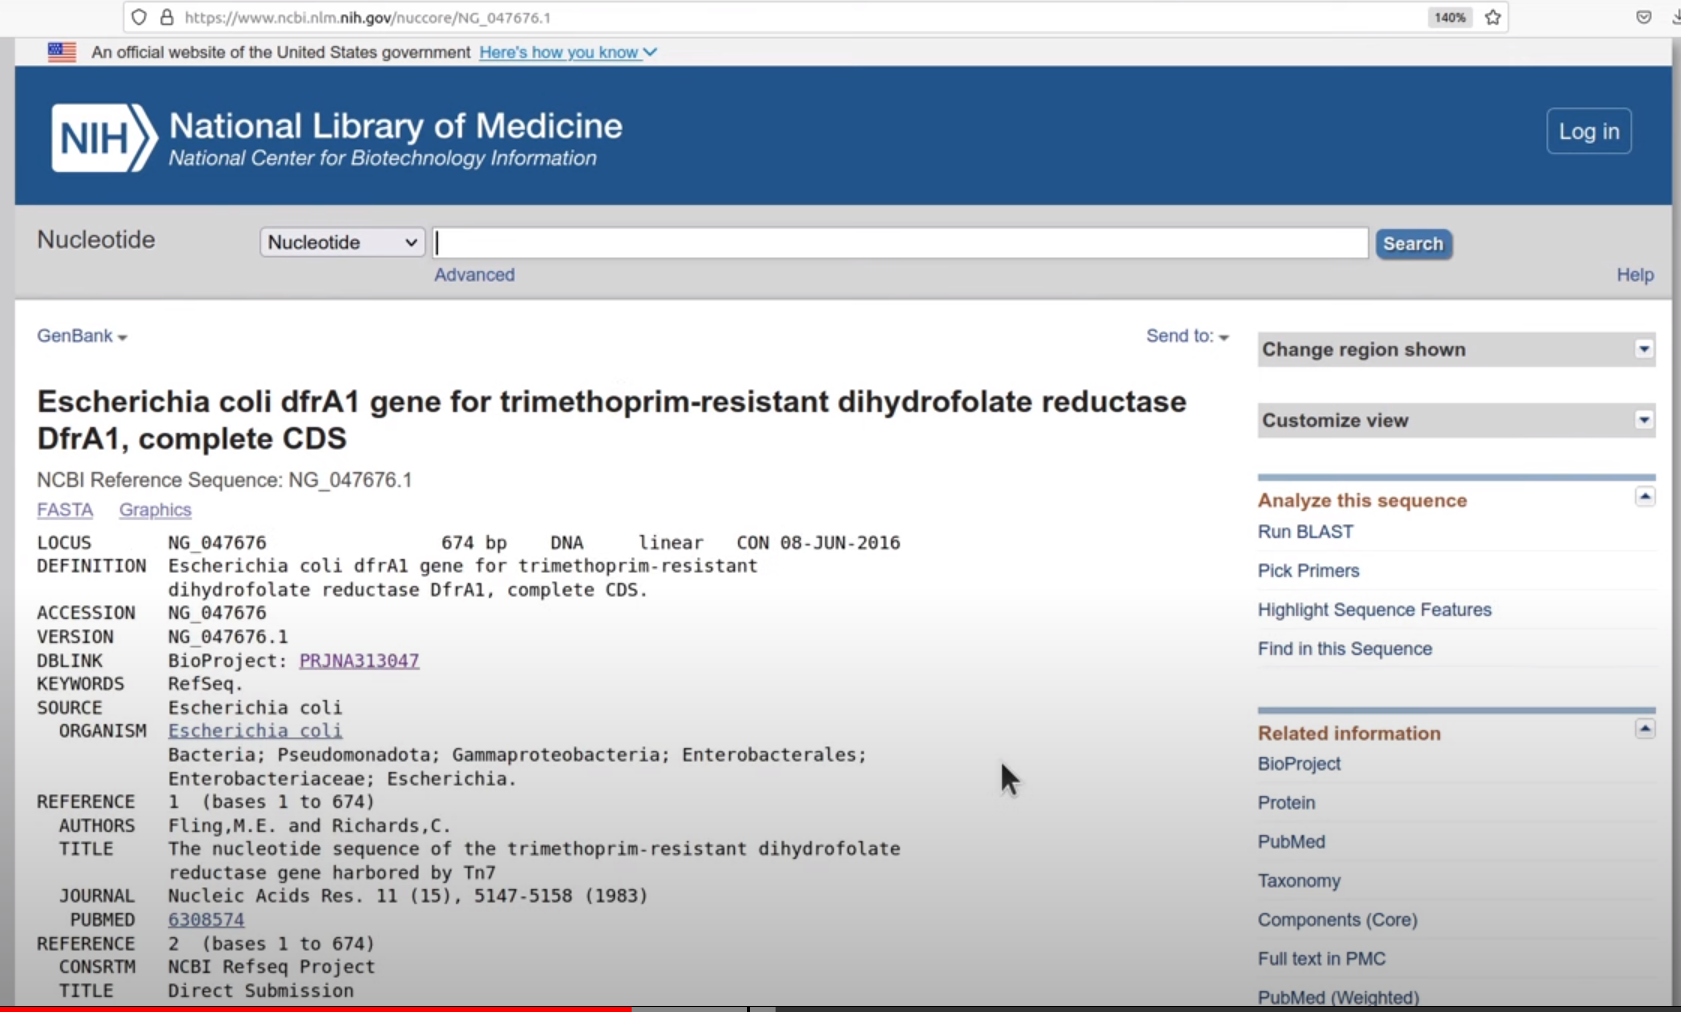
ACCESSION value on NCBI webserver
ABRicate can combine results into a simple matrix of gene presence/absence.
An absent gene is denoted by .
a present gene is represented by its %COVERAGE.
This can be individual abricate reports, or a combined one.
ABRicate Summary Tool with the following parameters:
ABRicate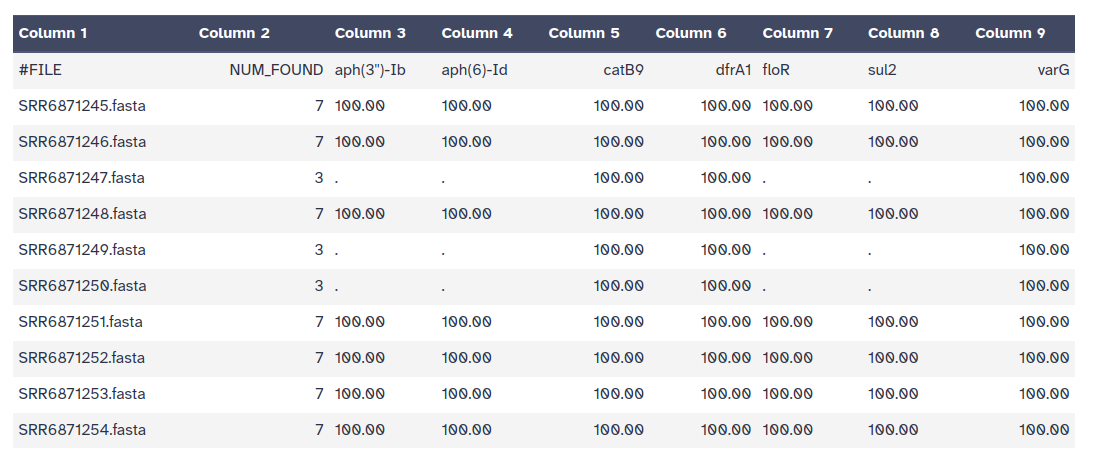
In this step we return back to the main goal of the tutorial where we want to identify the pathogens: identify if the bacteria found in our samples are pathogenic bacteria or not.
DEFINITIONS
Bacterial Pathogen: A bacterial pathogen is usually defined as any bacterium that has the capacity to cause disease. Its ability to cause disease is called pathogenicity.
Virulence: Virulence provides a quantitative measure of the pathogenicity or the likelihood of causing a disease.
Virulence Factors: Virulence factors refer to the properties (i.e., gene products) that enable a microorganism to establish itself on or within a host of a particular species and enhance its potential to cause disease. Virulence factors include bacterial toxins, cell surface proteins that mediate bacterial attachment, cell surface carbohydrates and proteins that protect a bacterium, and hydrolytic enzymes that may contribute to the pathogenicity of the bacterium.
To identify VFs, we use again ABRicate but this time with the VFDB from the advanced options of the tool.
ABRicate Tool with the following parameters:
Rename output collection as VFs
ABRicate Summary Tool with the following parameters:
ABRicate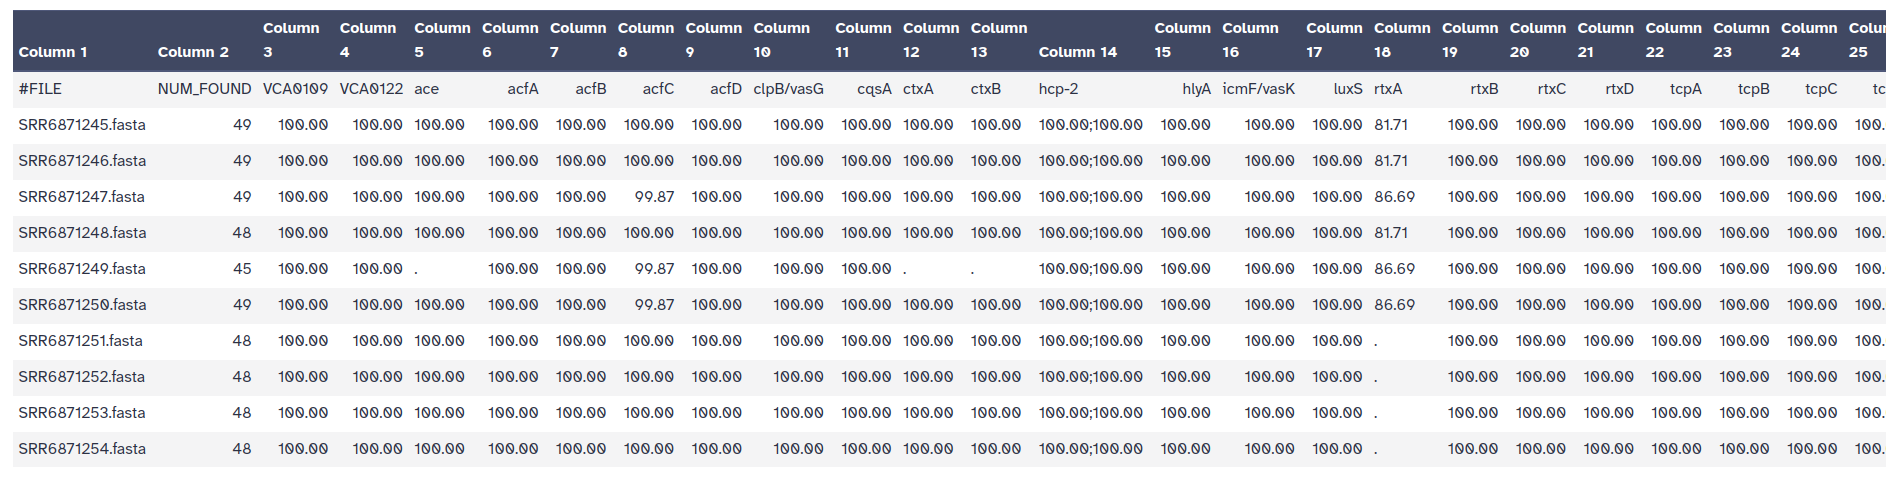
In this last section, we would like to show how to aggregate results and use the results to help tracking pathogenes among samples by:
In this way we can have an overview of all samples and the genes, but also how samples are related to each other i.e. which common pathogenic genes they share.
To execute the analysis in this section,
it is essential to handle and format the ABRicate output.
This processing is aimed at extracting a curated list comprising
Accession IDs of identified genes associated with Virulence Factors, along with their corresponding sample IDs.
Cut Tool with the following parameters:
Rename the outputs VFs accessions
Cut Tool with the following parameters:
Unique occurrences of each record Tool with the following parameters:
CutRename the outputs SampleIDs
Concatenate multiple datasets (tail-to-head by specifying how) Tool with the following parameters:
A heatmap is one of the visualization techniques that can give you a complete overview of all the samples together and whether or not a certain value exists. In this tutorial, we use the heatmap to visualize all samples aside and check which common bacteria pathogen genes are found in samples and which is only found in one of them.
We use Heatmap w ggplot tool along with other tabular manipulating tools to prepare the tabular files.
Collapse Collection Tool with the following parameters:
Add line to file Tool with the following parameters:
Collapse CollectionMulti-Join Tool with the following parameters:
Add line to fileReplace Tool with the following parameters:
Multi-Joindataset_(.*?)_Sample_(\S+)Acc_$1Replace Tool with the following parameters:
Replace toolAcc_00Replace Tool with the following parameters:
ReplaceAcc_\S*1Advanced Cut Tool with the following parameters:
Multi-Join toolAdvanced Cut Tool with the following parameters:
Replace toolPaste Tool with the following parameters:
Advanced Cut (Tool N. 7)Advanced Cut (Tool N. 8)Transpose Tool with the following parameters:
PasteReplace Tool with the following parameters:
Transpose toolAcc_Sample_Heatmap w ggplot Tool with the following parameters:
Replace tool
MLST tool is used to scan the pubMLST database against PubMLST typing schemes.
It’s one of the analyses that you can perform on your dataset to determine the allele IDs,
you can also detect novel alleles.
This step is not essential to identify pathogens and track them in the remainder of this tutorial, however we wanted to show some of the analysis that one can use Galaxy in to understand more about the dataset, as well as identifying the strain that might be a pathogen or not.
MLST Tool with the following parameters:
The output file of the MLST tool is a tab-separated output file which contains:
the filename
the closest PubMLST scheme name
the ST (sequence type)
the allele IDs

Re-Run with MRSA assembled genome